
前回のselect2のドロップダウンはjquery依存であったけれど、似たような機能のTom Selectはバニラjsでjqueryの依存がまったくないパッケージです。早速viteでビルドします。
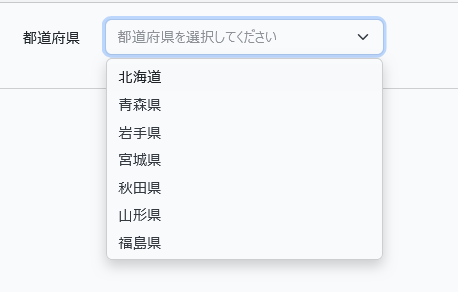
Tom Selectで選択
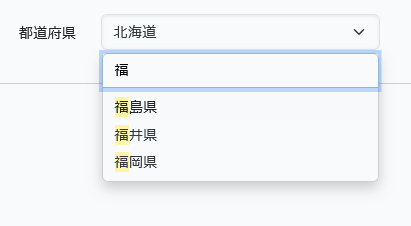
Tom Selectは、select2と同様にドロップダウンにおいて選択値の検索が可能です。
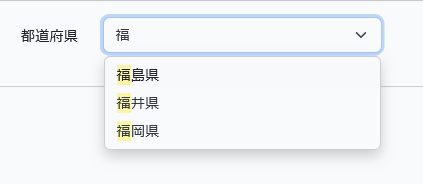
しかし、select2と比べるとわかりますが、検索窓のための行が追加されるのではなくドロップダウンの最初の行が検索窓となります。そこでBackキーを押すと行が以下のように空になり検索値をタイプできます。
ブレードは以下のようになります。
...
                      <div class="row mb-3">
                            <label for="prefecture-multiple" class="col-md-4 col-form-label text-md-end">都道府県(複数選択)</label>

                            <div class="col-md-6">
                                <select id="prefecture-multiple" placeholder="都道府県を選択してください" class="form-select @error('prefecture') is-invalid @enderror" name="prefectures[]" required multiple>
                                    @foreach($prefectures as $prefecture)
                                        <option value="{{ $prefecture }}" {{ in_array($prefecture, old('prefectures', [])) ? 'selected' : '' }}>{{ $prefecture }}</option>
                                    @endforeach
                                </select>

                                @error('prefectures')
                                    <span class="invalid-feedback" role="alert">
                                        <strong>{{ $message }}</strong>
                                    </span>
                                @enderror
                            </div>
                        </div>
...
@section('scripts')
<script type="module">
   document.addEventListener('DOMContentLoaded', function() {
        new TomSelect(document.getElementById('prefecture'));
   })
</script>
@endsection
select2のように検索窓を次の行に出すこともTomSelectに渡すオプションで変えることができます。
コードは以下となります。
<script type="module">
   document.addEventListener('DOMContentLoaded', function() {
        new TomSelect(document.getElementById('prefecture'), {
            plugins: ['dropdown_input'], // 検索窓の位置を変える
        });
   })
</script>
他のオプションとしては、
空行の選択を許す、
allowEmptyOption: true
全選択値を含む、
maxOptions: null
(これがないと、最初50個しか選択値に含まれないので注意を)
などがあります。
オプションに関してのドキュメントは以下となります。
https://tom-select.js.org/docs/
Tom Selectで複数を選択
もちろん、select2と同様に複数のアイテムの選択も可能です。
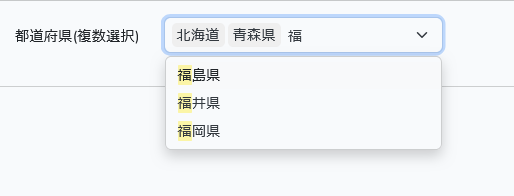
ブレードは、以下のようになります。
...
                      <div class="row mb-3">
                            <label for="prefecture-multiple" class="col-md-4 col-form-label text-md-end">都道府県(複数選択)</label>

                            <div class="col-md-6">
                                <select id="prefecture-multiple" placeholder="都道府県を選択してください" class="form-select @error('prefecture') is-invalid @enderror" name="prefectures[]" required multiple>
                                    @foreach($prefectures as $prefecture)
                                        <option value="{{ $prefecture }}" {{ in_array($prefecture, old('prefectures', [])) ? 'selected' : '' }}>{{ $prefecture }}</option>
                                    @endforeach
                                </select>

                                @error('prefectures')
                                    <span class="invalid-feedback" role="alert">
                                        <strong>{{ $message }}</strong>
                                    </span>
                                @enderror
                            </div>
                        </div>
...
@section('scripts')
<script type="module">
    document.addEventListener('DOMContentLoaded', function() {
        new TomSelect(document.getElementById('prefecture-multiple'), {
          maxOptions: null // 選択値制限なし
        ));
   })
</script>
@endsection
Tom Selectをviteでビルド
viteを使ってTom Selectのビルドを作成してみましょう。
まず、Tom Selectのパッケージを以下でローカル環境にインストールします。
$ npm install tom-select --save-dev
そして、bootstrap.jsにおいてそれらをインポートします。
import 'bootstrap';

import TomSelect from 'tom-select';
window.TomSelect = TomSelect;

// bootstrap5のcssをインポート
import '/node_modules/tom-select/dist/css/tom-select.bootstrap5.min.css';
viteの設定は以下となります。
import { defineConfig } from 'vite';
import laravel from 'laravel-vite-plugin';

export default defineConfig({
    plugins: [
        laravel({
            input: [
                'resources/sass/app.scss',
                'resources/js/app.js',
            ],
            refresh: true,
        }),
    ],
});
最後に
$ npm run build
とビルドします。
メルマガ購読の申し込みはこちらから。